Installing septic field lines is a crucial aspect of managing wastewater in areas not serviced by municipal sewer systems. A well-designed and properly installed septic system can effectively treat and disperse wastewater, protecting both the environment and public health. However, the process is not as simple as digging a trench and laying down pipes. It requires careful planning, understanding of local regulations, and knowledge of soil conditions.
Septic field lines, also known as leach lines or drain fields, are the final stage in a septic system. They play a vital role in filtering and dispersing effluent from the septic tank into the surrounding soil. This process allows the natural filtration of harmful pathogens and nutrients, preventing contamination of groundwater and nearby water bodies.
Before diving into the installation process, it’s essential to understand the components of a septic system, the types of field lines available, and the factors that influence their effectiveness. Factors such as soil type, drainage capacity, and local climate can significantly impact the performance of your septic system. Additionally, local health departments often have specific regulations governing the installation of septic systems, which must be adhered to in order to avoid costly fines or system failures.
This guide aims to provide a comprehensive overview of the installation process for septic field lines. Whether you’re a homeowner looking to install a new system or a contractor seeking to refresh your knowledge, this article will cover everything you need to know. From site evaluation and design considerations to the step-by-step installation process, we will equip you with the information necessary to ensure a successful septic field line installation.
Here’s a summary of what you can expect in this guide:
| Section | Description |
|---|---|
| Understanding Septic Systems | Overview of septic system components and their functions. |
| Site Evaluation | Factors to consider before installation, including soil testing and local regulations. |
| Design Considerations | Choosing the right type of field lines based on site conditions. |
| Installation Process | A step-by-step guide to installing septic field lines. |
| Maintenance Tips | Best practices for maintaining your septic system for longevity. |
Essential Steps for Installing Septic Field Lines
Installing septic field lines is not just a task; it’s a responsibility that requires attention to detail and adherence to regulations. This section will guide you through the critical steps involved in the installation process, ensuring that your septic system operates efficiently and effectively.

Understanding Your Septic System
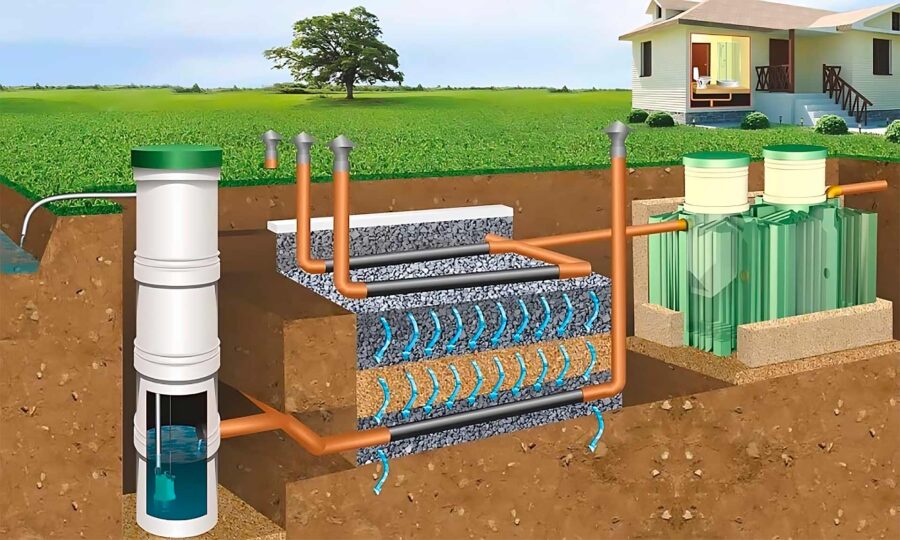
Before you start digging, it’s essential to understand the components of your septic system. A typical system consists of:
– Septic Tank: This is where the wastewater is initially treated. Solids settle at the bottom, while liquids flow out to the field lines.
– Drain Field (Leach Field): This is where the treated effluent is dispersed into the soil.
– Soil: The natural filter that treats the effluent before it reaches the groundwater.
Each of these components plays a crucial role in the overall functionality of the system.
Site Evaluation
Conducting a thorough site evaluation is vital before installation. Here’s what you need to consider:
1. Soil Testing: Determine the soil type and its percolation rate. Sandy soils drain well, while clay soils can lead to drainage issues.
2. Local Regulations: Check with your local health department for specific regulations regarding septic systems. These can vary significantly by location.
3. Distance from Water Sources: Ensure that your septic field lines are a safe distance from wells, lakes, and streams to prevent contamination.
Design Considerations
Once you have evaluated your site, it’s time to design your septic field lines. Here are some key considerations:
– Type of Field Lines: Choose between conventional gravity systems, pressure distribution systems, or alternative systems based on your site conditions.
– Size of the Drain Field: Calculate the required size based on the number of bedrooms in your home and the soil’s percolation rate.
– Layout: Plan the layout of the field lines to maximize efficiency and minimize the risk of system failure.
Installation Process
Now that you have a plan, it’s time to get to work. Follow these steps for a successful installation:
1. Gather Materials: Ensure you have all necessary materials, including pipes, gravel, and a septic tank.
2. Excavate the Trenches: Dig trenches according to the layout plan. The depth and width will depend on the type of system you are installing.
3. Install the Distribution Box: This box helps distribute effluent evenly across the field lines.
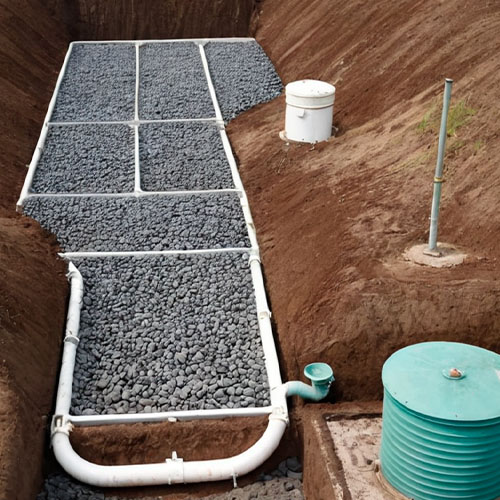
4. Lay the Field Lines: Place perforated pipes in the trenches, ensuring they are level and spaced correctly.
5. Add Gravel: Cover the pipes with gravel to promote drainage and protect the pipes from soil infiltration.
6. Backfill the Trenches: Once everything is in place, backfill the trenches with soil, ensuring not to compact it too much.
Maintenance Tips
After installation, maintaining your septic system is crucial for its longevity. Here are some best practices:
– Regular Inspections: Have your system inspected every 1-3 years by a professional.
– Pump the Septic Tank: Regularly pump the tank to remove solids and prevent clogs.
– Mind Your Water Usage: Avoid overloading the system with excessive water usage, which can lead to system failure.
Actionable Recommendations for Installing Septic Field Lines
Installing septic field lines is a significant undertaking that requires careful planning and execution. To ensure a successful installation and long-term functionality, consider the following actionable recommendations.
Pre-Installation Recommendations
Before you start the installation process, take these steps to set yourself up for success:
- Conduct a Soil Test:
- Hire a professional to assess soil type and percolation rates.
- Understand how your soil will affect the design and layout of your septic system.
- Check Local Regulations:
- Contact your local health department for specific guidelines.
- Obtain necessary permits before beginning installation.
- Plan for Future Maintenance:
- Design the layout to allow easy access for maintenance and pumping.
- Consider marking the location of the septic system for future reference.
Installation Recommendations
During the installation phase, adhere to these best practices:
- Follow the Design Plan:
- Stick to the layout you’ve created based on soil tests and local regulations.
- Ensure proper spacing between field lines to allow for adequate drainage.
- Use Quality Materials:
- Invest in high-quality pipes and gravel to prevent future issues.
- Ensure that all materials meet local building codes.
- Monitor the Installation:
- Have a knowledgeable person oversee the installation process.
- Double-check that everything is level and correctly aligned before backfilling.
Post-Installation Recommendations
Once your septic field lines are installed, follow these guidelines for ongoing maintenance:
- Regular Inspections:
- Schedule inspections every 1-3 years to catch potential issues early.
- Look for signs of system failure, such as slow drains or odors.
- Pump the Septic Tank:
- Plan to pump your septic tank every 3-5 years, depending on usage.
- Keep records of pumping and maintenance activities for future reference.
- Educate Household Members:
- Inform everyone in your household about what can and cannot go down the drain.
- Encourage water conservation practices to reduce strain on the system.
Summary of Recommendations
| Phase | Recommendations |
|---|---|
| Pre-Installation | Conduct soil tests, check regulations, plan for maintenance. |
| Installation | Follow design plans, use quality materials, monitor installation. |
| Post-Installation | Schedule regular inspections, pump the tank, educate household members. |

0 Comments